
How to transfer sounds from a tape recorder into the PC
This page is addressed to those, who are not familiar with soundcards.
For transferring sounds from the tape recorder into the PC you first need to connect the line-out jack of the recorder with the line-in jack of the sound card by an appropriate cable. Sound cards usually have a 3.5mm input jack. The line-out of the tape recorder is some times also a 3.5mm jack. So you will probably need a cable with male 3.5mm jacks on both ends. In case your recorder has a different line-out connector (cinch or XLR), an appropriate adapter is required. A common sound card has usually three connectors: microphone, line-in and line-out/speaker. So please make sure that you are using the correct one.
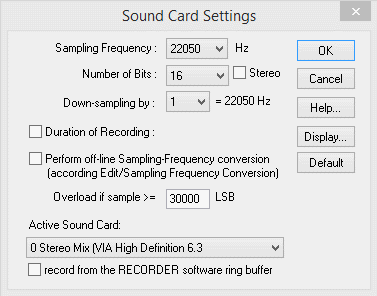
Besides the physical hardware connection described above you may have to make some adjustments from the Windows Control Panel (Control Panel > Hardware and Sound > Manage audio devices > Recording > Properties). In case you are not using the default audio recording device selected from the Windows Control Panel, launch the SASLab software dialog box “File”/”Sound Card Settings…” and select here the desired “Active Sound Card”.
At next you should start the recording by either the command “File”/”Recording” from the SASLab main window or by the command “Record”/”Start (input from soundcard)” from the Real-time spectrograph window (can be launched from the main window by “File”/”Real Time Spectrogram…” ).
Take care that the recording level of the audio input device is adjusted correctly. This is the same matter as the recording level adjustment on your tape recorder while recording from the microphone. Too high levels will cause clipping and distorted recordings. Too low levels will waste the available dynamic range of the sound card and further analysis will be affected too. Use the recording facility of the Real time spectrograph to get maximum support for monitoring the recording level. There is a level meter and a clipping indication flag.
Depending on the kind of signals to be analyzed, the sampling frequency of the sound card must be adapted. A basic law in digital signal processing is, that the maximum signal frequency, which can be recorded is equal to one half of the sampling frequency. Due to the characteristic of the build-in anti-aliasing filter of the sound card, the maximum frequency is usually a little bit lower that one half of the sampling frequency. That maximum frequency is also the maximum frequency visible on the spectrogram. The frequency resolution of a spectrogram can be computed from this formula:
resolution = sampling frequency / FFT length
This is the reason, why the frequency resolution of a spectrogram with low frequency sounds is poor, when the sampling frequency is too high. See also Selecting appropriate spectrogram parameter settings for an example. Therefore, the sampling frequency should be adjusted before the sounds are transferred into the PC (command File/Sound Card Settings…):
An alternative way to transfer long recordings into the computer is the real-time spectrogram window command ‘Record’ / ‘Stream into WAV file’. Use this command for long recordings. Overload can be easily recognized from the waveform display (which will turn read) and the permanent overflow flag.
For more sophisticated recording of sporadic sound events you should use the Avisoft-RECORDER software. This recording tool allows long-term sound-activated recording into .wav files. A large number of various parameter settings will help to match your specific requirements. See Avisoft RECORDER for details.