
RECORDER Manual
| |
Avisoft-RECORDER Getting Started
|
|
Getting started
1. Install the soundcard, audio interface or data acquisition device that you intend to use with Avisoft-RECORDER.
2. Configure Avisoft-RECORDER from the Options > Configuration...  dialog box. Note that Avisoft RECORDER is based on a concept that is completely different from other common sound recording applications. Starting and stopping recording sessions can be controlled by a wide range of trigger events (simple keyboard or joystick button hits, exceeding a certain sound level threshold, timer,
). In conventional recording applications a recording session can usually only be initiated by clicking at a button. dialog box. Note that Avisoft RECORDER is based on a concept that is completely different from other common sound recording applications. Starting and stopping recording sessions can be controlled by a wide range of trigger events (simple keyboard or joystick button hits, exceeding a certain sound level threshold, timer,
). In conventional recording applications a recording session can usually only be initiated by clicking at a button.
3. Start monitoring by the menu option Monitoring > Start  while saving of WAV-files is disabled (Pause button while saving of WAV-files is disabled (Pause button  is activated). is activated).
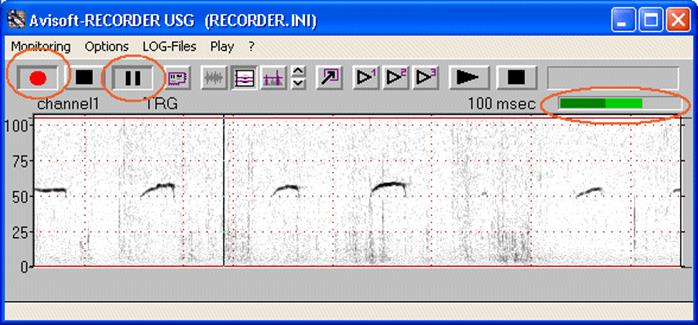
4. Adjust the recording level of the soundcard by using the recording control and mixer software supplied by the soundcard manufacturer (or the software supplied by Windows). External sound interfaces usually have a physical recording level adjustment knob (e.g. Avisoft-UltraSoundGate). Adjust the recording level in such a way that there is no over-modulation (clipping). Clipping is indicated by red colour on the recording level bar, the waveform display and the spectrogram display. It is also important to prevent too soft recordings. Soft recording levels would waste the potentially available dynamic range of the recording hardware and might lead to poor signal-to-noise ratios.
5. Optimise the configuration settings, especially the trigger event settings by entering the Options > Configuration... dialog again or by mouse tracking of thresholds and frequency ranges in the spectrogram and energy display. Once the triggering behaviour is working satisfying, enable saving of .WAV files by releasing the stop button .

6. Stop monitoring by the command Monitoring > Stop  . .
7. Check the acquired sound files that should have been saved in the base directory specified in the configuration dialog. Use Avisoft-SASLab Lite/Pro to navigate comfortably through these consecutive numbered WAV-files. Once a numbered WAV-file in the format T0000001.WAV has been opened in Avisoft-SASLab Pro, there will be two additional menu options for that purpose in the File menu: Previous file  and Next file and Next file  . The menu option Delete file can be used to delete single files. All succeeding files will then be re-numbered. . The menu option Delete file can be used to delete single files. All succeeding files will then be re-numbered.
Basic concepts
Avisoft-RECORDER is a versatile software tool for various sound recording and playback tasks. This chapter describes its basic concepts.
While common sound recording/editing software applications usually require to enter a filename for each newly acquired soundfile, Avisoft-RECORDER saves the soundfiles under subsequently numbered file names in the same way as in digital photo cameras or CompactFlash audio recorders. This automatic file naming concept enables the automated acquisition of sounds without any further user interaction.
In contrast to other sound recording applications, Avisoft-RECORDER employs a basic monitoring mode in which the audio data are streamed continuously from the audio interface (sound card or data acquisition card) into a temporary circular data buffer. At the same time, the incoming sounds are visualized on the screen as oscillograms or spectrograms. At this stage, no data will be saved into any sound file and the process can run endlessly (for days or weeks). The actual recording procedure (saving the data stream into a sound file on the harddisk) is initiated by an internal logic trigger state. This trigger state can be controlled from various sources (listbox 'Trigger' on the configuration dialog box). Among these trigger sources are:
- instantaneous sound level of the incoming audio data (sound-activated)
- keyboard stroke
- joystick button hit
- interval timer
- time program (time table)
- digital input of the data acquisition board (or Avisoft-UltraSoundGate)
- permanent
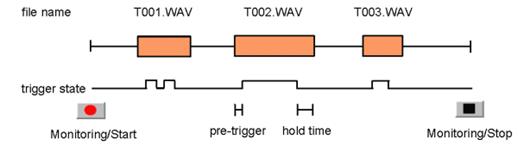
The sound will be saved into the current numbered file as long as the logic trigger is active. If the trigger becomes inactive, the sound file will be closed and the next occurrence of a trigger will create a new (incremented) file.
The internal logic trigger signal is additionally modified by a pretrigger interval and a hold time interval. The "Pretrigger" parameter will shift the beginning of the sound file into the past. In this way it is possible to catch sounds that occurred before activating the trigger (also known as 'pre-recording buffer'). Similarly, the end of the soundfile can be delayed by the specified 'Hold' time:
An exception from the standard triggered recording mode is the trigger type "permanent". In this mode of operation, the sound files will be created immediately after clicking at the red recording button. This behavior corresponds to common sound recording applications:

Optimizing sound-activated recording
Under practical recording conditions it is often problematic to distinguish between environmental noise (e.g. cracks caused by the activity of the animals) and the desired vocalizations. So, it might happen that the trigger is also activated by that unwanted noise:
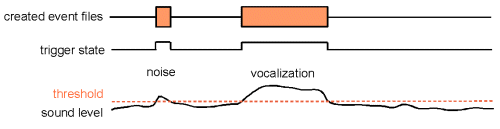
However, it is possible to minimize those false alarms by optimizing the settings of the Avisoft-RECORDER software. Assuming that the noise is softer than the vocalizations, the threshold should be set to value that is well above the peak noise level. In order not to lose softer parts of the vocalizations at the beginning or end of a call or phrase, the pretrigger and hold-time parameters should be increased accordingly:

In case the vocalizations to be acquired have a harmonic structure (whistle-like sounds) and the disturbing noise has a broad-band structure, then it is possible to reject such broad-band noise by activating the Entropy threshold. In this way, even noise louder than the desired vocalizations would be rejected.
Adjusting the threshold level for sound-activated recording
The threshold level for the sound-activated trigger mode (Trigger = "level of this channel") can be adjusted either by entering the desired level numerically from the configuration dialog box:

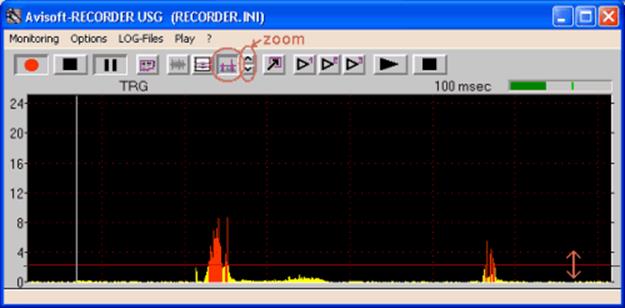
or graphically by mouse dragging on the "energy in f-range" real-time display:
|
|