
SASLab Manual
| |
Spectrogram window : Tools > Automatic parameter measurements > Automatic parameter measurements setup > Classification
|
|
The detected sound elements can also be classified automatically based on the measured parameters. For this purpose, a set of element classes can be defined.
There are two classification methods available:
Axis-parallel thresholds :
A class is represented by at least one parameter range (defined by an upper and/or lower threshold) for each of the activated parameters. If a detected element satisfies all the parameter criterions of one of these classes, this element will be associated to that particular class.
Linear discriminant analysis :
For each pre-defined class a linear discrimination function score is computed:
Si = ci + wi1*x1 + wi2*x2 + ... + wim*xm
In this formula, the subscript i denotes the respective class; the subscripts 1, 2, ..., m denote the m parameters; ci is a constant for the i'th group, wij is the weight for the j'th parameters in the computation of the classification score for the i'th group;
xj is the observed value for the respective case for the j'th variable. Si is the resultant classification score. The maximum classification score Si will determine the class assigned to the element.
Both classification mechanisms may be used for note type classification or species discrimination. The number of elements associated to each class can be counted automatically for statistics purposes.
The Classification settings dialog box allows defining the individual classes for the classification tool.
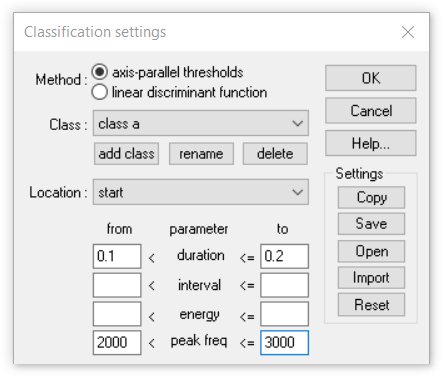
Class This combo box selects the class to be defined. Each class is identified by its name listed in this field.
add class
Use this button to add a new class to the configuration. The class name entered on the New class name dialog box can have up to 30 characters.
rename
Use this button to rename the selected class.
delete
Use this button to remove the selected class from the configuration.
Location
This combo box selects the location of measurements to be edited. The list contains all locations activated in the Automatic Parameter Measurements setup dialog box (except Regular intervals of, which is not available for classification purposes)
The parameter list below the Location combo box shows all activated parameters (except Interpulse interval, Absolute time, Frequencies of peaks and Amplitude of peaks, which are not available for classification).
axis-parallel thresholds method:
The edit fields below from and to define the range limits (thresholds), which must be specified for each class and each location. The unit and scale of these thresholds is the same as in the numeric Automatic Parameter Measurements display window (1s, 1Hz or 1dB). If there is either no lower or upper threshold needed, the corresponding filed can be left empty (don't care). If there is more than one parameter activated, all specified criterions for all parameters must be satisfied in order to assign the class to an element (logic AND combination). A logic OR combination could be realized by creating an additional class entry having the same class name.
discriminant function mode:
The edit fields constant and weight define constant and the indiviual weights for each parameter in the classification function.
Copy settings
This button copies the current classification settings for all classes into the clipboard (tab-delimited ASCII format), which allows to export the class definitions to other applications like Excel.
Save
This button saves the current classification settings for all classes into a *.cls file (tab-delimited ASCII format).
Open
Opens a previously saved *.cls file. If there are parameters in the loaded file that are not active in the current settings of the Automatic Parameter Measurements tool, these parameters will be activated automatically. The *.cls files can be edited manually (e.g. in Excel). However, the headline on the first row should not be altered. The horizontal tab (HT) delimiters between the data fields must be preserved. Additional rows may be added. The Open command can also be invoked by drag&drop from the Windows File Explorer window.
Import
This command is equivalent to the Open command, except that the parameters, stored in the *.cls file and which are not active in the current configuration, will not be activated automatically. In other words, the Import command imports only those parameters from the .cls file that have already been activated in the current configuration. The Import command can also be invoked by drag&drop while the shift key is pressed.
The Save and Open/Import commands may be useful for efficiently handling different classification settings. Note however that the classification settings are also saved into the SASLab configuration file (*.ini). Therefore, switching between classification settings could also be accomplished by using different .ini configuration files.
Reset
Resets the parameter limits for all classes and locations.
Configuring the classification option
|
First enable the Enable classification option on the Automatic Parameter Measurements settings dialog box and launch the Classification settings dialog box from the Settings button.
- Select the desired classification method (axis-parallel thresholds or linear discriminant function)
- Add a new class by clicking at the add class button and enter its name into the New class name dialog box.
- Select the Location for which you want to input the range limits (if you have activated more than one location in the Automatic Parameter Measurements setup dialog box).
- Input the classification thresholds:
axis-parallel thresholds method:
Input the lower (from) and upper (to) limits for each parameter at each location. If one limit is out of interest (don't care), leave the corresponding field(s) empty. Repeat this procedure (goto 2, add class button) until you have defined all required classes.
linear discriminant function method:
Input the constant and the weights for each parameter at each location for the discriminant function. When specifying a threshold, the samples will only be classified to one of the pre-defined classes when the classification score Si exceeds this threshold. Leave this edit field empty if no threshold exclusion is desired. When the option use min(abs(score)) is activated, the classification criterion is the smallest absolute value of the classification scores (instead of the maximum). This option may be useful for situations, where the standard linear discriminant approach with looking for the maximum score does not work. Assuming you need to classify elements based on a single parameter (e.g. the dominant frequency) into more than two classes. When setting the constant to the group centroid (the mean dominant frequency of each class) and the weight to -1.0, the samples will be classified successfully (you would get similar results when using the axis-parallel thresholds option with appropriate interval settings, but the discriminant function method might be easier to setup).
- Repeat this procedure (goto 2., add class) until you have defined all required classes.
The specified limits (or the constants and the weights for the discriminant functions) can be edited later by selecting the corresponding Class and Location entries. For complex settings use the Copy settings button to see an overview display of all classes and locations by pasting this overview into a spreadsheet. Additionally, the classification limits of each class can be seen on the 3D-Scatterplot view, which can be activated from the statistics setup dialog box.
Note that the classification settings will be lost once the parameter or location selections in the Automatic Parameter Measurements setup have changed.
|
|